A few people have asked me about the cushion/pillow backs on the crochet cushions I've made, so I'll show you how I made it.
I originally had the idea after seeing the tutorial from the lovely Lucy at Attic 24 on crochet cushion construction. Lucy uses repurposed woollen jumpers/sweaters to make her cushion backs. It's a fabulous idea, but I live in a place where very few people wear or own woollen sweaters, and after searching high and low through op (thrift) shops and not finding anything, I came up with my own version of a cushion back.
I use 8ply (DK) yarn when I'm crocheting and either a 4mm or 4.5mm hook.
I'm going to assume that you already know how to crochet with basic stitches and understand how to read a pattern. The photos are of a sample swatch I made and a finished cushion I made last year. If I had to make another cushion for this tutorial, I would never have made the tutorial!!!!!!!
The very first thing to do is make a sample swatch. You really really need to do this so that you aren't undoing lots of rows that you've spent time and love making, trust me!
I usually start with roughly 20 chain. This should give you a swatch that's at least three to four inches across. It doesn't have to be exact, just enough to give you an accurate measurement on how many stitches you make to the inch.
Skip 2 chain, treble UK (dc US) across your chain.

Turn and continue by making a treble in each treble for another 5 rows, so that you have 6 rows in total.

Measure the number of stitches you have in an inch. It's good to take several measurements to make sure that you are consistent. You can see below that across a couple of inches, I make 4 stitches to an inch.

Now for the math. You need to work out how many stitches you need to cover the width of your cushion. In this case I have a 16 inch square cushion, so it is 16 inches across. I work 4 stitches to the inch, and I need 16 inches, therefore I need to have 16 x 4 stitches = 64 stitches. Don't fuss too much with it, and it's better to be slightly under than over as the crochet will stretch a little. Make your chain remembering that you need the extra two chain at the beginning before you make your first treble (dc US). So in my case, 66 chain.
If your cushion is a different size and your tension is different so that you have a different number of stitches to the inch you will have to change your calculations, to allow for the differences. If you have problems with working this out, I'm happy to help.
If I was making a 20 inch cushion and my tension is 4 stitches to the inch the math would be 20 x 4 = 80 stitches.
If I worked 3.5 stitches to the inch and I was making a 16 inch cushion the math would be 16 x 3.5 = 56 stitches.
Now start hooking to your hearts content, in my case 64 treble (dc US) each row, you can make it stripey or plain, whatever your heart desires. Keep going until you have a piece that is roughly two thirds the height of the back of the cushion. Cast off.
Now do the same again, the same number of chain and make another piece that is at least a third of the height of the cushion. When the two pieces are placed together to make in my case a 16 inch square they should overlap by at least two inches. Again, don't stress too much it's just a rough guide, you do need enough overlap so that it doesn't gape when the cushion filler is inserted.
For the edging and buttonholes. Take a contrasting colour and dc (sc US) into each of the treble (dc US) on the top of the larger piece.

Now for some more fun math. In this case I have 64 stitches and I want to use 6 buttons on this cushion. I need to work out how far apart they need to be so they are evenly spaced.
With 6 buttons there will be 7 spaces like so
______O_____O_____O_____O_____O_____O_____
Now divide the number of spaces into the number of stitches. 64 ÷ 7 = 9.142857 again don't stress. It means that you need to make a buttonhole approx every ninth stitch. There will be an extra stitch, as 9 x 7 = 63 so I would have the extra stitch either at the beginning or the end of the row.
On this cushion I would dc 9, * chain 2, skip a dc (sc), dc (sc) in each of next 8 dc (sc)* repeat to the end of the row.
If you are using bigger buttons you may need to ch 3 instead of 2 in each space.
Congratulations you are now on the home stretch. I found it easier to sew all the pieces together rather than trying to crochet them together, but if you feel confident, go ahead and crochet them together. Place the front right side up, now the larger backing piece right side down, and the smaller backing piece on top right side down. Pin the overlapping area securely to make sure that you sew through all three layers. Sew all layers together around the outside.

Turn right side out and mark where the buttons should go. Sew them on and voila, a beautifully finished crochet cushion.


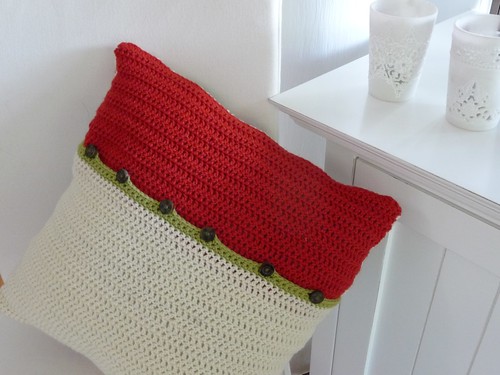
If you make a cushion back using this tutorial please let me know. I've started a Flickr group so that you can post photos of the cushion backs you've created.
|
| My first cushion back |
I use 8ply (DK) yarn when I'm crocheting and either a 4mm or 4.5mm hook.
I'm going to assume that you already know how to crochet with basic stitches and understand how to read a pattern. The photos are of a sample swatch I made and a finished cushion I made last year. If I had to make another cushion for this tutorial, I would never have made the tutorial!!!!!!!
The very first thing to do is make a sample swatch. You really really need to do this so that you aren't undoing lots of rows that you've spent time and love making, trust me!
I usually start with roughly 20 chain. This should give you a swatch that's at least three to four inches across. It doesn't have to be exact, just enough to give you an accurate measurement on how many stitches you make to the inch.
Skip 2 chain, treble UK (dc US) across your chain.

Turn and continue by making a treble in each treble for another 5 rows, so that you have 6 rows in total.

Measure the number of stitches you have in an inch. It's good to take several measurements to make sure that you are consistent. You can see below that across a couple of inches, I make 4 stitches to an inch.

Now for the math. You need to work out how many stitches you need to cover the width of your cushion. In this case I have a 16 inch square cushion, so it is 16 inches across. I work 4 stitches to the inch, and I need 16 inches, therefore I need to have 16 x 4 stitches = 64 stitches. Don't fuss too much with it, and it's better to be slightly under than over as the crochet will stretch a little. Make your chain remembering that you need the extra two chain at the beginning before you make your first treble (dc US). So in my case, 66 chain.
If your cushion is a different size and your tension is different so that you have a different number of stitches to the inch you will have to change your calculations, to allow for the differences. If you have problems with working this out, I'm happy to help.
If I was making a 20 inch cushion and my tension is 4 stitches to the inch the math would be 20 x 4 = 80 stitches.
If I worked 3.5 stitches to the inch and I was making a 16 inch cushion the math would be 16 x 3.5 = 56 stitches.
Now start hooking to your hearts content, in my case 64 treble (dc US) each row, you can make it stripey or plain, whatever your heart desires. Keep going until you have a piece that is roughly two thirds the height of the back of the cushion. Cast off.
Now do the same again, the same number of chain and make another piece that is at least a third of the height of the cushion. When the two pieces are placed together to make in my case a 16 inch square they should overlap by at least two inches. Again, don't stress too much it's just a rough guide, you do need enough overlap so that it doesn't gape when the cushion filler is inserted.
For the edging and buttonholes. Take a contrasting colour and dc (sc US) into each of the treble (dc US) on the top of the larger piece.

Now for some more fun math. In this case I have 64 stitches and I want to use 6 buttons on this cushion. I need to work out how far apart they need to be so they are evenly spaced.
With 6 buttons there will be 7 spaces like so
______O_____O_____O_____O_____O_____O_____
Now divide the number of spaces into the number of stitches. 64 ÷ 7 = 9.142857 again don't stress. It means that you need to make a buttonhole approx every ninth stitch. There will be an extra stitch, as 9 x 7 = 63 so I would have the extra stitch either at the beginning or the end of the row.
On this cushion I would dc 9, * chain 2, skip a dc (sc), dc (sc) in each of next 8 dc (sc)* repeat to the end of the row.
If you are using bigger buttons you may need to ch 3 instead of 2 in each space.
 |
| Sample only where I've only made 1 chain for the button hole but you should get the idea. |
Congratulations you are now on the home stretch. I found it easier to sew all the pieces together rather than trying to crochet them together, but if you feel confident, go ahead and crochet them together. Place the front right side up, now the larger backing piece right side down, and the smaller backing piece on top right side down. Pin the overlapping area securely to make sure that you sew through all three layers. Sew all layers together around the outside.

Turn right side out and mark where the buttons should go. Sew them on and voila, a beautifully finished crochet cushion.

On this cushion I used 5 buttons. The width of the cushion is 12 inches (48 stitches). 5 buttons means 6 spaces. 48 ÷ 6 = 8
A button hole every 8th stitch.
If you make a cushion back using this tutorial please let me know. I've started a Flickr group so that you can post photos of the cushion backs you've created.