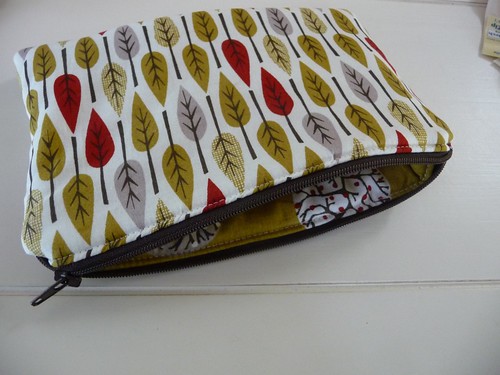
I CAN make a pouch with a zipper.
It took me awhile, and amazingly enough, not too much swearing, but it's finished.
I'm not 100% happy with it, but as a first it's ok.
I ordered some zips from Zipit on Etsy but they haven't arrived yet so I searched through my stuff to see if I had a zip. I found one that I've had for years.
It was brown! Rather ironic with all the "no to brown" stuff happening with the Mouthy Stitches Swap.
So another ferret around in my stash to find some co-ordinating fabric that I could live with. I must say, I was tempted to make a really brown pouch and post it on Flickr as my pouch ready to go to my partner. I decided I should be nice, not naughty.

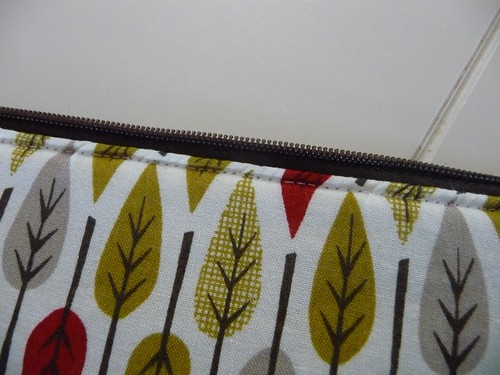
I found a solid to make the tabs at the end of the zips and an internal pocket. It was a waste of time making the tabs, as it turned out the zip was too long for the purse and so the tabs disappeared. Below, this is all that's left of one end.

I referred to Ayumi's tutorial to make a pocket for inside the pouch but I didn't use her tutorial for the actual pouch. The pocket worked well.

I'm going to try a different tutorial next time. I'm not going to tell you whose I did use this time.
Next time I'll be using either a shorter zip or making the pouch larger. The zip to pouch ratio was all wrong.
There was too much interfacing on this pouch too, so next time I'm going to only use one piece of interfacing on each side, not two on each side. It's made it really bulky at the seams, even though I've trimmed it.
If anyone from Mouthy Stitches is reading this and is very worried that I'll be making their zippered pouch, I'm going to make a few more before I work on THE one.
You can breathe a sigh of relief. I promise it won't be brown.
It took me awhile, and amazingly enough, not too much swearing, but it's finished.
I'm not 100% happy with it, but as a first it's ok.
I ordered some zips from Zipit on Etsy but they haven't arrived yet so I searched through my stuff to see if I had a zip. I found one that I've had for years.
It was brown! Rather ironic with all the "no to brown" stuff happening with the Mouthy Stitches Swap.
So another ferret around in my stash to find some co-ordinating fabric that I could live with. I must say, I was tempted to make a really brown pouch and post it on Flickr as my pouch ready to go to my partner. I decided I should be nice, not naughty.
I found a solid to make the tabs at the end of the zips and an internal pocket. It was a waste of time making the tabs, as it turned out the zip was too long for the purse and so the tabs disappeared. Below, this is all that's left of one end.
I referred to Ayumi's tutorial to make a pocket for inside the pouch but I didn't use her tutorial for the actual pouch. The pocket worked well.
I'm going to try a different tutorial next time. I'm not going to tell you whose I did use this time.
Next time I'll be using either a shorter zip or making the pouch larger. The zip to pouch ratio was all wrong.
There was too much interfacing on this pouch too, so next time I'm going to only use one piece of interfacing on each side, not two on each side. It's made it really bulky at the seams, even though I've trimmed it.
If anyone from Mouthy Stitches is reading this and is very worried that I'll be making their zippered pouch, I'm going to make a few more before I work on THE one.
You can breathe a sigh of relief. I promise it won't be brown.
Looks good...sometimes you need to make a few prototypes to get it perfect!
ReplyDeleteI think you did very well for your first pouch with a zipper! I love the fabrics you've used, especially the one you've used for the lining.
ReplyDeleteOnce you've made a few you'll whip through them. I only interface the outer fabric, and if you zip is too long, just trim it down. I tried tabs but don't use them. For a first attempt it looks pretty darn good!
ReplyDeleteI think it looks pretty good for a first attempt. I've noticed that sometimes the measurements on tutorials are not always accurate which is a real bummer when you put your faith in them!
ReplyDeleteHappy practising. (Looks better than anything I can knock out !)
lol - phew - bit concerned if I was your partner......lol - no, not really - great effort for your first go...
ReplyDeletea little tip, when you put tabs on your zip, make sure tab end to tab end is 1/2" shorter than the width of your pouch (if you're using 1/4" seams) - and sew next to the tabs (easier with the zip foot so you can get nice and close), not over them - that way you get a lovely finish.
Good for you! It is not that hard, as you have learned. I just cut the longer zippers off so that they are the size I need.
ReplyDeleteBrilliant! I think it looks great, though it is a shame about your tabs as I think the red would have provided such a great contrast. You CAN do it. Now, lets go bully Shay into it!!
ReplyDeleteLooks great! And hardly any swearing, that is amazing, given that working with zippers usually inspires that in most stitchers. As Leanne said, cut the longer zippers off---but before you do that, make a new "stop" with a few ins and outs with needle and thread at the right length!
ReplyDeleteNice zipper work there Marg, That would have been hilarious putting a brown pouch on flickr. How now brown pouch! I really like the fabric you chose and you did exceptionally well considering the pattern you use sounds soo bad!
ReplyDeleteGreat job for the first try (uh oh, wasn't my tute was it? Although I can't think I added 2 pieces of interfacing...)
ReplyDeleteI think it's a great job, period. Really nice.
ReplyDeleteYip, yip, yip. Well done you. ANd I just happen to like the fabric even if it is brownish!
ReplyDeleteGreat pouch (gosh I hate that word!!!) despite the problems you had! I bet you used the same tutorial as I did! I am lucky to have about 6 zips my Mum never used and was able to change the zip I was using! And I also decided that I won't be interfacing ALL pieces next time either!! Another trick I saw on a different tute was to make the lining pieces slightly smaller so it fits more snuggly inside! good luck with your next efforts!
ReplyDeleteYour fabrics are lovely! Never mind these brown detractors after all coffee and chocolate are brown and I love those!
ReplyDeleteNicely done! Even if it's your first time out, it turned out lovely!
ReplyDeleteThey say practice makes perfect! I'm still practicing that one too....love the fabrics on this pouch :-)
ReplyDeleteDespite all of your issues during the process, the pouch looks fantastic!
ReplyDelete